
TypeScript API, Vector Search & UI
This article is a short introduction to TrailBase and some of its features. We’ll bootstrap a database with coffee data, implement a custom TypeScript HTTP handler for finding the best matches using vector search, and deploy a simple production-ready web app all in ~100 lines of code.
The conclusion of this tutorial is part of the main code repository and can be found here or downloaded by running:
$ git clone https://github.com/trailbaseio/trailbase$ cd trailbase/examples/coffee-vector-searchImporting Data
Section titled “Importing Data”Before building the app, let’s import some data. Keeping it simple,
we’ll use the sqlite3 CLI1 directly to import
examples/coffee-vector-search/arabica_data_cleaned.csv with the following SQL
script:
-- First create the strictly typed "coffee" table.CREATE TABLE coffee (  Species TEXT,  Owner TEXT,
  Aroma REAL,  Flavor REAL,  Acidity REAL,  Sweetness REAL,
  embedding BLOB) STRICT;
-- Then import the data into a "temporary" table..mode csv.import arabica_data_cleaned.csv temporary
-- Then import the un-typed temporary data into the typed "coffee" table.INSERT INTO coffee (Species, Owner, Aroma, Flavor, Acidity, Sweetness)  SELECT    Species,    Owner,
    CAST(Aroma AS REAL) AS Aroma,    CAST(Flavor AS REAL) AS Flavor,    CAST(Acidity AS REAL) AS Acidity,    CAST(Sweetness AS REAL) AS Sweetness  FROM temporary;
-- And clean up.DROP TABLE temporary;
Note that we didn’t initialize the vector embedding. This is merely because
sqlite3 doesn’t have the necessary extensions built-in.
We’ll update the entries later on, adding the embedding as part of our initial
database migrations2.
From within the example/coffee-vector-search directory, you can execute the script
above and import the coffee data by running:
$ mkdir -p traildepot/data$ cat import.sql | sqlite3 traildepot/data/main.db -After importing the data while still in the same directory, we can start the
trail server:
$ trail runBecause trail starts for the first time the migrations in
traildepot/migrations will be applied, which are essentially:
UPDATE coffee SET embedding = vec_f32(FORMAT("[%f, %f, %f, %f]", Aroma, Flavor, Acidity, Sweetness));initializing the previously skipped coffee.embedding for all records.
Custom Endpoints
Section titled “Custom Endpoints”We can use WASM components to declare custom HTTP API routes among other things.
Any time you start trail run3, WebAssembly components, i.e. .wasm files,
under traildepot/wasm will be loaded (compiled from WASM IR to native) and
initialized.
So let’s get started.
Project Setup
Section titled “Project Setup”First we need to set up the project in which the code for our endpoints lives
and which ultimately compiles into a .wasm component:
mkdir endpointcd endpoint
# Init a node ESM project:npm init -ynpm pkg set type="module";
# Install dependencies:npm install -D vite typescript ts-node eslint prettier @types/node @bytecodealliance/jconpm install trailbase-wasm
# Init TypeScript:npx tsc --inittouch index.ts
# Init Vite:echo "import { defineConfig } from 'vite'
export default defineConfig({  build: {    lib: {      entry: './index.ts',      formats: ['es'],      fileName: 'index',    },    rollupOptions: {      preserveEntrySignatures: 'strict',      external: /(wasi|trailbase):.*/,    },  },})" > vite.config.ts
# Build empty 'index.ts' to check everything works:npx vite buildcargo init --lib endpointcd endpointcargo add trailbase-wasm
echo '[lib]crate-type = ["cdylib"]' >> Cargo.tomlImplementation
Section titled “Implementation”With the project set up, we can define the actual endpoint to find our desired
coffee.
Alternatively, you can peek in examples/coffee-vector-search/guests to see the result.
import { defineConfig } from "trailbase-wasm";import { HttpHandler, HttpResponse } from "trailbase-wasm/http";import type { HttpRequest } from "trailbase-wasm/http";import { query } from "trailbase-wasm/db";
async function searchHandler(req: HttpRequest): Promise<HttpResponse> {  // Get the query params from the url, e.g. '/search?aroma=4&acidity=7'.  const aroma = req.getQueryParam("aroma") ?? 8;  const flavor = req.getQueryParam("flavor") ?? 8;  const acid = req.getQueryParam("acidity") ?? 8;  const sweet = req.getQueryParam("sweetness") ?? 8;
  // Query the database for the closest match.  const rows = await query(    `SELECT Owner, Aroma, Flavor, Acidity, Sweetness         FROM coffee         ORDER BY vec_distance_L2(           embedding, FORMAT("[%f, %f, %f, %f]", $1, $2, $3, $4))         LIMIT 100`,    [+aroma, +flavor, +acid, +sweet],  );
  return HttpResponse.json(rows);}
export const { initEndpoint, incomingHandler, sqliteFunctionEndpoint } = defineConfig({ httpHandlers: [HttpHandler.get("/search", searchHandler)], });#![forbid(unsafe_code, clippy::unwrap_used)]#![allow(clippy::needless_return)]#![warn(clippy::await_holding_lock, clippy::inefficient_to_string)]
use trailbase_wasm::db::{Value, query};use trailbase_wasm::http::{HttpError, HttpRoute, Json, Request, StatusCode, routing};use trailbase_wasm::{Guest, export};
type SearchResponse = (String, f64, f64, f64, f64);
async fn search_handler(req: Request) -> Result<Json<Vec<SearchResponse>>, HttpError> { let (mut aroma, mut flavor, mut acidity, mut sweetness) = (8, 8, 8, 8);
for (param, value) in req.url().query_pairs() { match param.as_ref() { "aroma" => aroma = value.parse().unwrap_or(aroma), "flavor" => flavor = value.parse().unwrap_or(flavor), "acidity" => acidity = value.parse().unwrap_or(acidity), "sweetness" => sweetness = value.parse().unwrap_or(sweetness), _ => {} } }
// Query the closest match using vector-search. let results: Vec<SearchResponse> = query( r#" SELECT Owner, Aroma, Flavor, Acidity, Sweetness FROM coffee ORDER BY vec_distance_L2( embedding, FORMAT("[%f, %f, %f, %f]", $1, $2, $3, $4)) LIMIT 100 "#, [ Value::Integer(aroma), Value::Integer(flavor), Value::Integer(acidity), Value::Integer(sweetness), ], ) .await .map_err(|err| HttpError::message(StatusCode::INTERNAL_SERVER_ERROR, err))? .into_iter() .map(|row| { // Convert to json response. let Value::Text(owner) = row[0].clone() else { panic!("invariant"); };
return ( owner, as_real(&row[1]).expect("invariant"), as_real(&row[2]).expect("invariant"), as_real(&row[3]).expect("invariant"), as_real(&row[4]).expect("invariant"), ); }) .collect();
return Ok(Json(results));}
fn as_real(v: &Value) -> Result<f64, String> { return match v { Value::Real(f) => Ok(*f), _ => Err(format!("Not a real: {v:?}")), };}
// Lastly, implement and export a TrailBase component.struct GuestImpl;
impl Guest for GuestImpl { fn http_handlers() -> Vec<HttpRoute> { return vec![routing::get("/search", search_handler)]; }}
export!(GuestImpl);Building
Section titled “Building”Lastly, we need to build the .wasm component that we can copy into
<traildepot>/wasm/ for the trail binary to pick up:
# Build a JavaScript library from our TypeScript endpoint:npx vite build
# Build the WASM component:npx jco componentize dist/index.js -w node_modules/trailbase-wasm/wit -o dist/component.wasm
# Copy it to our <traildepot>/wasmmkdir -p <traildepot>/wasmcp dist/component.wasm <traildepot>/wasm/TODOThat’s it, we’re done with the custom server-side endpoint using vector search to find the best coffee.
With component in our <traildepot>/wasm folder and trail run up, we can
test the public /search endpoint:
$ curl "http://localhost:4000/search?aroma=8&flavor=8&acidity=8&sweetness=8"[ ["juan luis alvarado romero",7.92,7.58,7.58,8], ["eileen koyanagi",7.5,7.33,7.58,8], ...]A simple Web UI
Section titled “A simple Web UI”After setting up our database, vector search and API, we’re mostly done with the TrailBase-specific parts. Just for good measure, we’re also building a simple web UI to consume our API and tie everything neatly together. It’s quick and lets us touch more generally on bundling and deploying web applications with TrailBase. The consumer could equally be a mobile app, some other backend or something entirely different.
Implementation
Section titled “Implementation”Note that this is not a web dev tutorial. The specifics of the UI aren’t the
focus. We chose React as a well-known option and kept the implementation to
less than 80 lines of code.
In case you want to build your own, we recommend
vite to quickly set up an SPA with your favorite JS
framework, e.g.: npm create vite@latest my-project -- --template react.
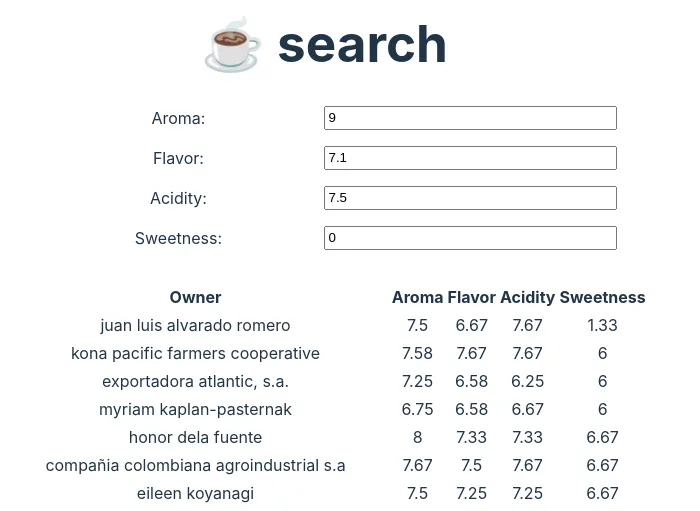
Our provided reference implementation, renders 4 numeric input fields to search for coffee with a certain aroma, flavor, acidity and sweetness score:
import { useState, useEffect } from "react";import "./App.css";
const Input = (props: {  label: string;  value: number;  update: (v: number) => void;}) => (  <>    <label>{props.label}:</label>    <input      type="number"      step={0.1}      max={10}      min={0}      value={props.value}      onChange={(e) => props.update(e.target.valueAsNumber)}    />  </>);
function Table() {  const [aroma, setAroma] = useState(8);  const [flavor, setFlavor] = useState(8);  const [acidity, setAcidity] = useState(8);  const [sweetness, setSweetness] = useState(8);
  type Record = [string, number, number, number, number];  const [data, setData] = useState<Record[]>([]);
  useEffect(() => {    const URL = import.meta.env.DEV ? "http://localhost:4000" : "";    const params = new URLSearchParams({      aroma: `${aroma}`,      flavor: `${flavor}`,      acidity: `${acidity}`,      sweetness: `${sweetness}`,    });
    fetch(`${URL}/search?${params}`).then(async (r) => setData(await r.json()));  }, [aroma, flavor, acidity, sweetness]);
  return (    <>      <div className="inputs" style={{ margin: "2rem" }}>        <Input label="Aroma" value={aroma} update={setAroma} />        <Input label="Flavor" value={flavor} update={setFlavor} />        <Input label="Acidity" value={acidity} update={setAcidity} />        <Input label="Sweetness" value={sweetness} update={setSweetness} />      </div>
      <div className="table">        <table>          <thead>            <tr>              <th>Owner</th>              <th>Aroma</th>              <th>Flavor</th>              <th>Acidity</th>              <th>Sweetness</th>            </tr>          </thead>
          <tbody>            {data.map((row) => (              <tr>                {row.map((d) => (                  <td>{d.toString()}</td>                ))}              </tr>            ))}          </tbody>        </table>      </div>    </>  );}
export const App = () => (  <>    <h1>☕ search</h1>    <Table />  </>);
We can start a dev-server with the UI from above and hot-reload running:
$ npm install && npm devDeployment: Putting Everything Together
Section titled “Deployment: Putting Everything Together”Whether you’ve followed along or skipped to here, we can now put everything
together.
Let’s start by compiling our JSX/TSX web UI down to pure HTML, JS, and CSS
artifacts the browser can understand:
$ npm install && npm buildThe artifacts are written to ./dist and can be served alongside our database
as well as custom API by running:
$ trail run --public-dir distYou can now check out your fully self-contained app under http://localhost:4000/ or browse the coffee data and access logs in the admin dashboard. The admin credentials are logged to the terminal on first start.
All4 we need to serve our application in production is:
- the
trailbinary, - the
traildepotfolder containing the data and endpoints, - the
distfolder containing our web app.
At the end of the day it’s just a bunch of hermetic files without transitively
depending on a pyramid of shared libraries or requiring other services to be up
and running like a separate database server.
This makes it very easy to just copy the files over to your server or bundle
everything in a single container.
examples/coffee-vector-search/Dockerfile is an example of how you can both build and
bundle using Docker. In fact,
$ docker build -t coffee . && docker run -p 4000:4000 coffeewill speed-run this entire tutorial by building and starting the app listening on http://localhost:4000/.
That’s it. We hope this was a fun little intro to some of TrailBase’s features. There’s more we haven’t touched on: CRUD APIs, auth, admin dash, file uploads, just to name a few. If you have any feedback, don’t hesitate and reach out on GitHub.
What’s Next?
Section titled “What’s Next?”Thanks for making it to the end. Beyond the basic example above, the repository contains a more involved examples, such as:
- A Blog with both, a Web and Flutter UI, more complex APIs, authorization and custom user profiles.
- A collaborative clicker game demonstrating server-side rendering (SSR) with popular JS frameworks and realtime updates to synchronize state.
Any questions or suggestions? Reach out on GitHub and help us improve the docs. Thanks!
Footnotes
Section titled “Footnotes”-
If you don’t have
sqlite3already installed, you can install it usingbrew install sqlite,apt-get install sqlite3, or download pre-built binaries ↩ -
Migrations are versioned SQL scripts that will be executed by the database on first encounter to programmatically and consistently evolve your database schema and data along with your code. For example, when you add a new column you’ll likely want all your integration tests, development setups, and production deployments to add the column so your application logic has a consistent schema to target. ↩
-
Unless explicitly disabled. ↩
-
For sensitive use-cases, e.g. auth, you’ll also need certificates for integrity and end end-to-end TLS encryption. For less sensitive use cases, such as establishing an authority, you could fall back to TLS termination via a CDN like cloudflare. ↩